2021年4月6日、Django 3.2がリリースされました。3系としては初のLTS版です。
祝・Django 3.2リリース!
公式サイトでのリリース情報は以下を参照してください。
Django 3.2 release notes | Django documentation | Django
3.2のサポート期限は2024年4月までです。各バージョンのサポート期限についての詳細は以下公式ドキュメント「Supported Versions」を参照してください。
Download Django | Django
それでは、主な変更点について紹介します。
Automatic AppConfig discovery# DjangoではアプリケーションのメタデータをAppConfig に書くことができますが、default_app_configやINSTALLED_APPSに指定しなくても自動的にこれを検出できるようになりました。
この変更により、default_app_configは非推奨になりました。
例として、exampleというアプリケーションにAppConfigを書いてみましょう。
1
2
3
4
5
6
7
"""example/app.py"""
from django.apps import AppConfig
class ExampleConfig (AppConfig):
name = "example"
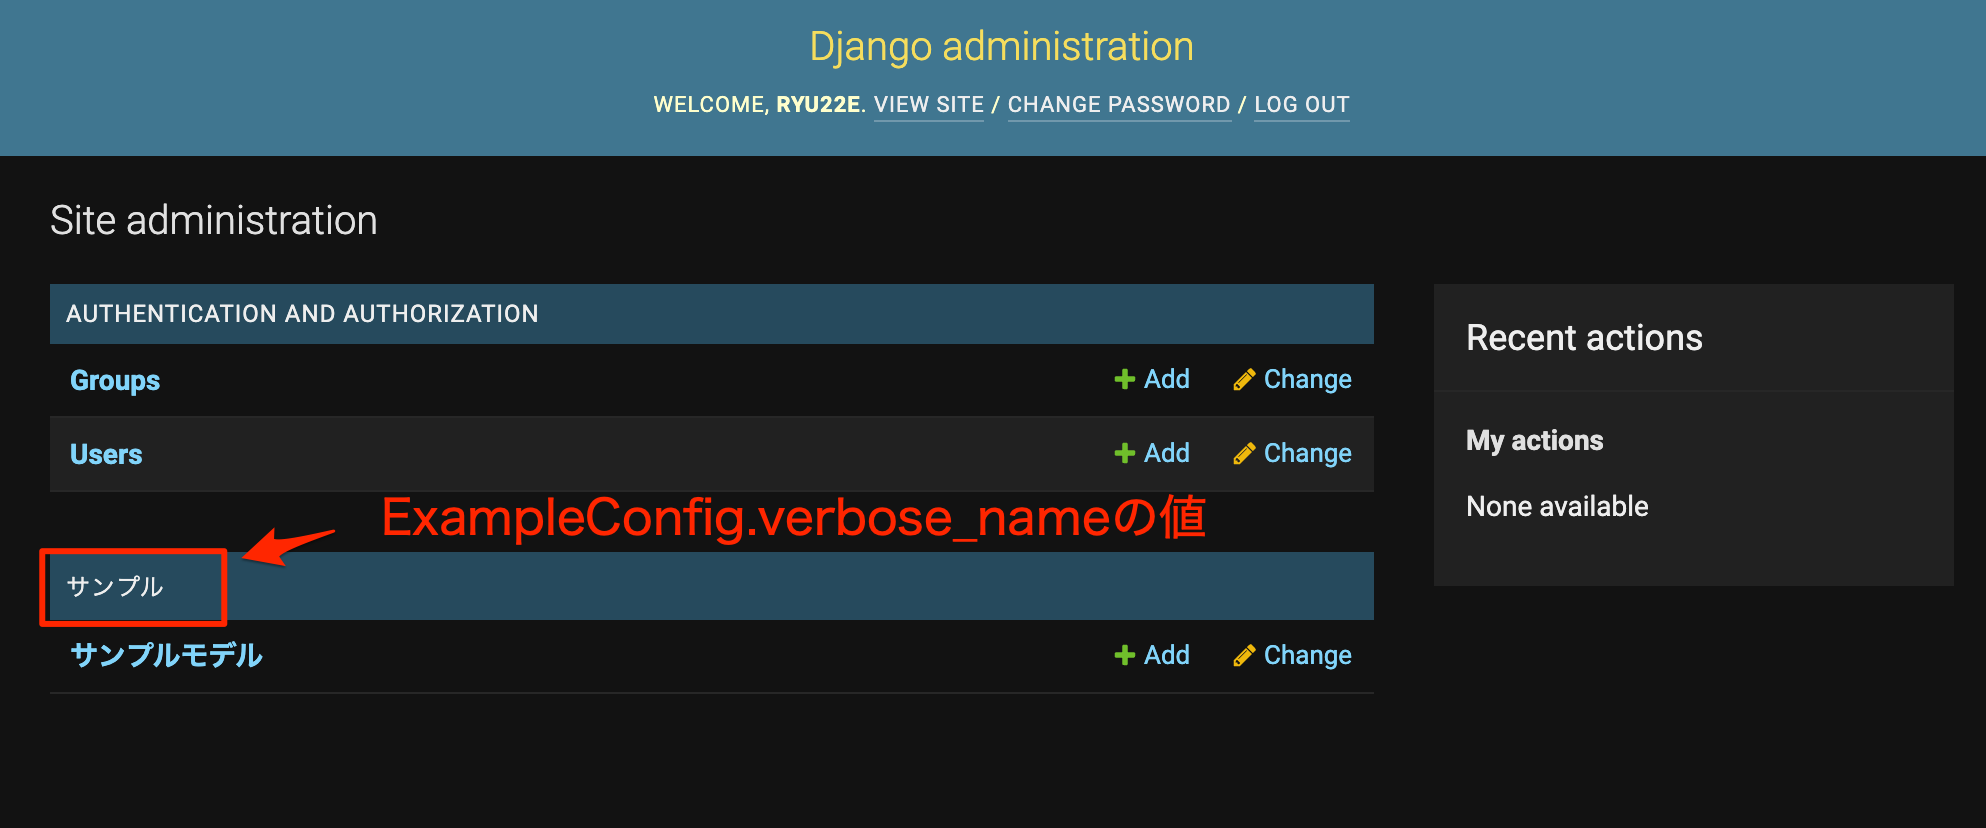
verbose_name = "サンプル"
Django 3.1以下では、上記コードを認識させるにはexample/__init__.pyにdefault_app_config = "example.apps.ExampleConfig"と書くか、INSTALLED_APPSに"example.apps.ExampleConfig"を書く必要がありました。3.2からは上記コードのみで十分です。
runserverでサーバーを立ち上げてhttp://127.0.0.1:8000/admin/を開くと、以下のようにExampleConfig.verbose_nameの値が表示されているはずです。
http://127.0.0.1:8000/admin/ の内容
Customizing type of auto-created primary keys# Djangoのモデルではprimary_key=Trueが指定されたフィールドがない場合に暗黙の主キーidが追加されますが、この主キーのフィールドの種類をカスタマイズできるようになりました。
DEFAULT_AUTO_FIELD でプロジェクト全体の主キーフィールドを指定できます。デフォルトはdjango.db.models.AutoField です。(3.1以下と同じ挙動)
また、特定のアプリケーションだけカスタマイズしたい場合はAppConfig.default_auto_field を指定してください。
例として、exampleアプリケーションに以下のモデルを定義してみましょう。
1
2
3
4
5
6
7
8
9
from django.db import models
class Example (models. Model):
title = models. CharField(verbose_name= "タイトル" , max_length= 100 )
class Meta :
verbose_name = "サンプルモデル"
verbose_name_plural = "サンプルモデル"
settings.pyにDEFAULT_AUTO_FIELD = "django.db.models.BigAutoField"を書いてからmakemigrationsコマンドを実行してみましょう。
example/migrations/0001_initial.pyの内容を読むと、idはmodels.BigAutoFieldが指定されています。
 1
 2
 3
 4
 5
 6
 7
 8
 9
10
11
12
13
14
15
16
17
18
19
20
21
22
23
24
25
# Generated by Django 3.2 on 2021-04-06 09:41
from django.db import migrations, models
class Migration (migrations. Migration):
initial = True
dependencies = [
]
operations = [
migrations. CreateModel(
name= 'Example' ,
fields= [
('id' , models. BigAutoField(auto_created= True , primary_key= True , serialize= False , verbose_name= 'ID' )),
('title' , models. CharField(max_length= 100 , verbose_name= 'タイトル' )),
],
options= {
'verbose_name' : 'サンプルモデル' ,
'verbose_name_plural' : 'サンプルモデル' ,
},
),
]
また、主キーをカスタマイズされると不都合がある場合は、以下の方法でカスタマイズを防ぐこともできます。
【方法1】DEFAULT_AUTO_FIELDに明示的にdjango.db.models.AutoFieldを指定する。(プロジェクト全体でカスタマイズを防ぎます)
1
DEFAULT_AUTO_FIELD = "django.db.models.AutoField"
【方法2】AppConfig.default_auto_fieldに明示的にdjango.db.models.AutoFieldを指定する。(特定のアプリケーションのみカスタマイズを防ぎます)
1
2
3
4
5
6
from django.apps import AppConfig
class ExampleConfig (AppConfig):
default_auto_field = "django.db.models.AutoField" # これを追加
name = "example"
【方法3】モデルにidフィールドを定義して明示的にdjango.db.models.AutoFieldを指定する。(特定のモデルのみカスタマイズを防ぎます)
 1
 2
 3
 4
 5
 6
 7
 8
 9
10
from django.db import models
class Example (models. Model):
id = models. AutoField(primary_key= True ) # これを追加
title = models. CharField(verbose_name= "タイトル" , max_length= 100 )
class Meta :
verbose_name = "サンプルモデル"
verbose_name_plural = "サンプルモデル"
Functional indexes# モデルに「関数インデックス」(または「式インデックス」)を使えるようになりました。これにより、任意の関数・式の結果をキーにした検索でもインデックスが効くようになります。
例として、以下のモデルを定義してみましょう。
 1
 2
 3
 4
 5
 6
 7
 8
 9
10
11
12
13
14
15
16
17
18
19
20
21
22
23
24
25
from django.db import models
from django.db.models import F, Index, Value
from django.db.models.functions import Lower, Upper
class Example (models. Model):
first_name = models. CharField(max_length= 255 )
last_name = models. CharField(max_length= 255 )
height = models. IntegerField()
weight = models. IntegerField()
class Meta :
verbose_name = "サンプルモデル"
verbose_name_plural = "サンプルモデル"
indexes = [
Index(
Lower("first_name" ),
Upper("last_name" ). desc(),
name= "first_last_name_idx" ,
),
Index(
F("height" ) / (F("weight" ) + Value(5 )),
name= "calc_idx" ,
),
]
makemigrationsコマンドを実行すると、以下のマイグレーションファイルが作成されます。
 1
 2
 3
 4
 5
 6
 7
 8
 9
10
11
12
13
14
15
16
17
18
19
20
21
22
23
24
25
26
27
28
29
30
31
32
33
34
35
36
37
38
# Generated by Django 3.2 on 2021-04-06 09:42
from django.db import migrations, models
import django.db.models.expressions
import django.db.models.functions.text
class Migration (migrations. Migration):
initial = True
dependencies = [
]
operations = [
migrations. CreateModel(
name= 'Example' ,
fields= [
('id' , models. AutoField(auto_created= True , primary_key= True , serialize= False , verbose_name= 'ID' )),
('first_name' , models. CharField(max_length= 255 )),
('last_name' , models. CharField(max_length= 255 )),
('height' , models. IntegerField()),
('weight' , models. IntegerField()),
],
options= {
'verbose_name' : 'サンプルモデル' ,
'verbose_name_plural' : 'サンプルモデル' ,
},
),
migrations. AddIndex(
model_name= 'example' ,
index= models. Index(django. db. models. functions. text. Lower('first_name' ), django. db. models. expressions. OrderBy(django. db. models. functions. text. Upper('last_name' ), descending= True ), name= 'first_last_name_idx' ),
),
migrations. AddIndex(
model_name= 'example' ,
index= models. Index(django. db. models. expressions. CombinedExpression(django. db. models. expressions. F('height' ), '/' , django. db. models. expressions. CombinedExpression(django. db. models. expressions. F('weight' ), '+' , django. db. models. expressions. Value(5 ))), name= 'calc_idx' ),
),
]
sqlmigrateで出力されるSQLは以下のとおりです。(データベースはSQLite 3.35.3を使用)
 1
 2
 3
 4
 5
 6
 7
 8
 9
10
11
12
13
14
BEGIN ;
--
-- Create model Example
--
CREATE TABLE "example_example" ("id" integer NOT NULL PRIMARY KEY AUTOINCREMENT, "first_name" varchar(255 ) NOT NULL , "last_name" varchar(255 ) NOT NULL , "height" integer NOT NULL , "weight" integer NOT NULL );
--
-- Create index first_last_name_idx on Lower(F(first_name)), OrderBy(Upper(F(last_name)), descending=True) on model example
--
CREATE INDEX "first_last_name_idx" ON "example_example" ((LOWER ("first_name" )), (UPPER ("last_name" )) DESC );
--
-- Create index calc_idx on F(height) / F(weight) + Value(5) on model example
--
CREATE INDEX "calc_idx" ON "example_example" ((("height" / ("weight" + 5 ))));
COMMIT ;
pymemcache support# Memcached 用のキャッシュバックエンドdjango.core.cache.backends.memcached.PyMemcacheCacheが追加されました。pymemcache 3.4.0以上が必要です。具体的な使用方法は以下公式ドキュメントを参照してください。
Django’s cache framework | Django documentation | Django
3.1以下でもdjango.core.cache.backends.memcached.MemcachedCacheというMemcached用キャッシュバックエンドはあったのですが、依存しているpython-memcached がメンテナンスされなくなったため、作り直したようです。詳しい経緯については以下のDjango Issue Trackerを参照してください。
#29887 (Add support for pymemcache) – Django
New decorators for the admin site# admin用の新しいデコレータdisplay() ・action() が追加されました。
display()はlist_display とreadonly_fields 、action()はactions と組み合わせて使います。
以下に使用例を載せます。
 1
 2
 3
 4
 5
 6
 7
 8
 9
10
11
12
13
14
15
16
17
18
19
20
21
22
23
24
25
26
27
28
29
30
31
from django.contrib import admin
from .models import Example
@admin.action (description= "Mark selected stories as published" )
def make_published (modeladmin, request, queryset):
queryset. update(status= Example. Status. PUBLISHED)
class ExampleAdmin (admin. ModelAdmin):
list_display = ("is_published" ,)
readonly_fields = ("full_name" ,)
actions = (make_published,)
@admin.display (
boolean= True ,
ordering= "-publish_date" ,
description= "Is Published?" ,
)
def is_published (self, obj):
return obj. publish_date is not None
@admin.display (
description= "Full Name" ,
)
def full_name (self, obj):
return obj. first_name + " " + obj. last_name
admin. site. register(Example, ExampleAdmin)
3.1以下での書き方も以下に載せます。
 1
 2
 3
 4
 5
 6
 7
 8
 9
10
11
12
13
14
15
16
17
18
19
20
21
22
23
24
25
26
27
28
29
from django.contrib import admin
from .models import Example
def make_published (modeladmin, request, queryset):
queryset. update(status= Example. Status. PUBLISHED)
make_published. short_description = "Mark selected stories as published"
class ExampleAdmin (admin. ModelAdmin):
list_display = ("is_published" ,)
readonly_fields = ("full_name" ,)
actions = (make_published,)
def is_published (self, obj):
return obj. publish_date is not None
is_published. boolean = True
is_published. admin_order_field = "-publish_date"
is_published. short_description = "Is Published?"
def full_name (self, obj):
return obj. first_name + " " + obj. last_name
full_name. short_description = "Full Name"
admin. site. register(Example, ExampleAdmin)
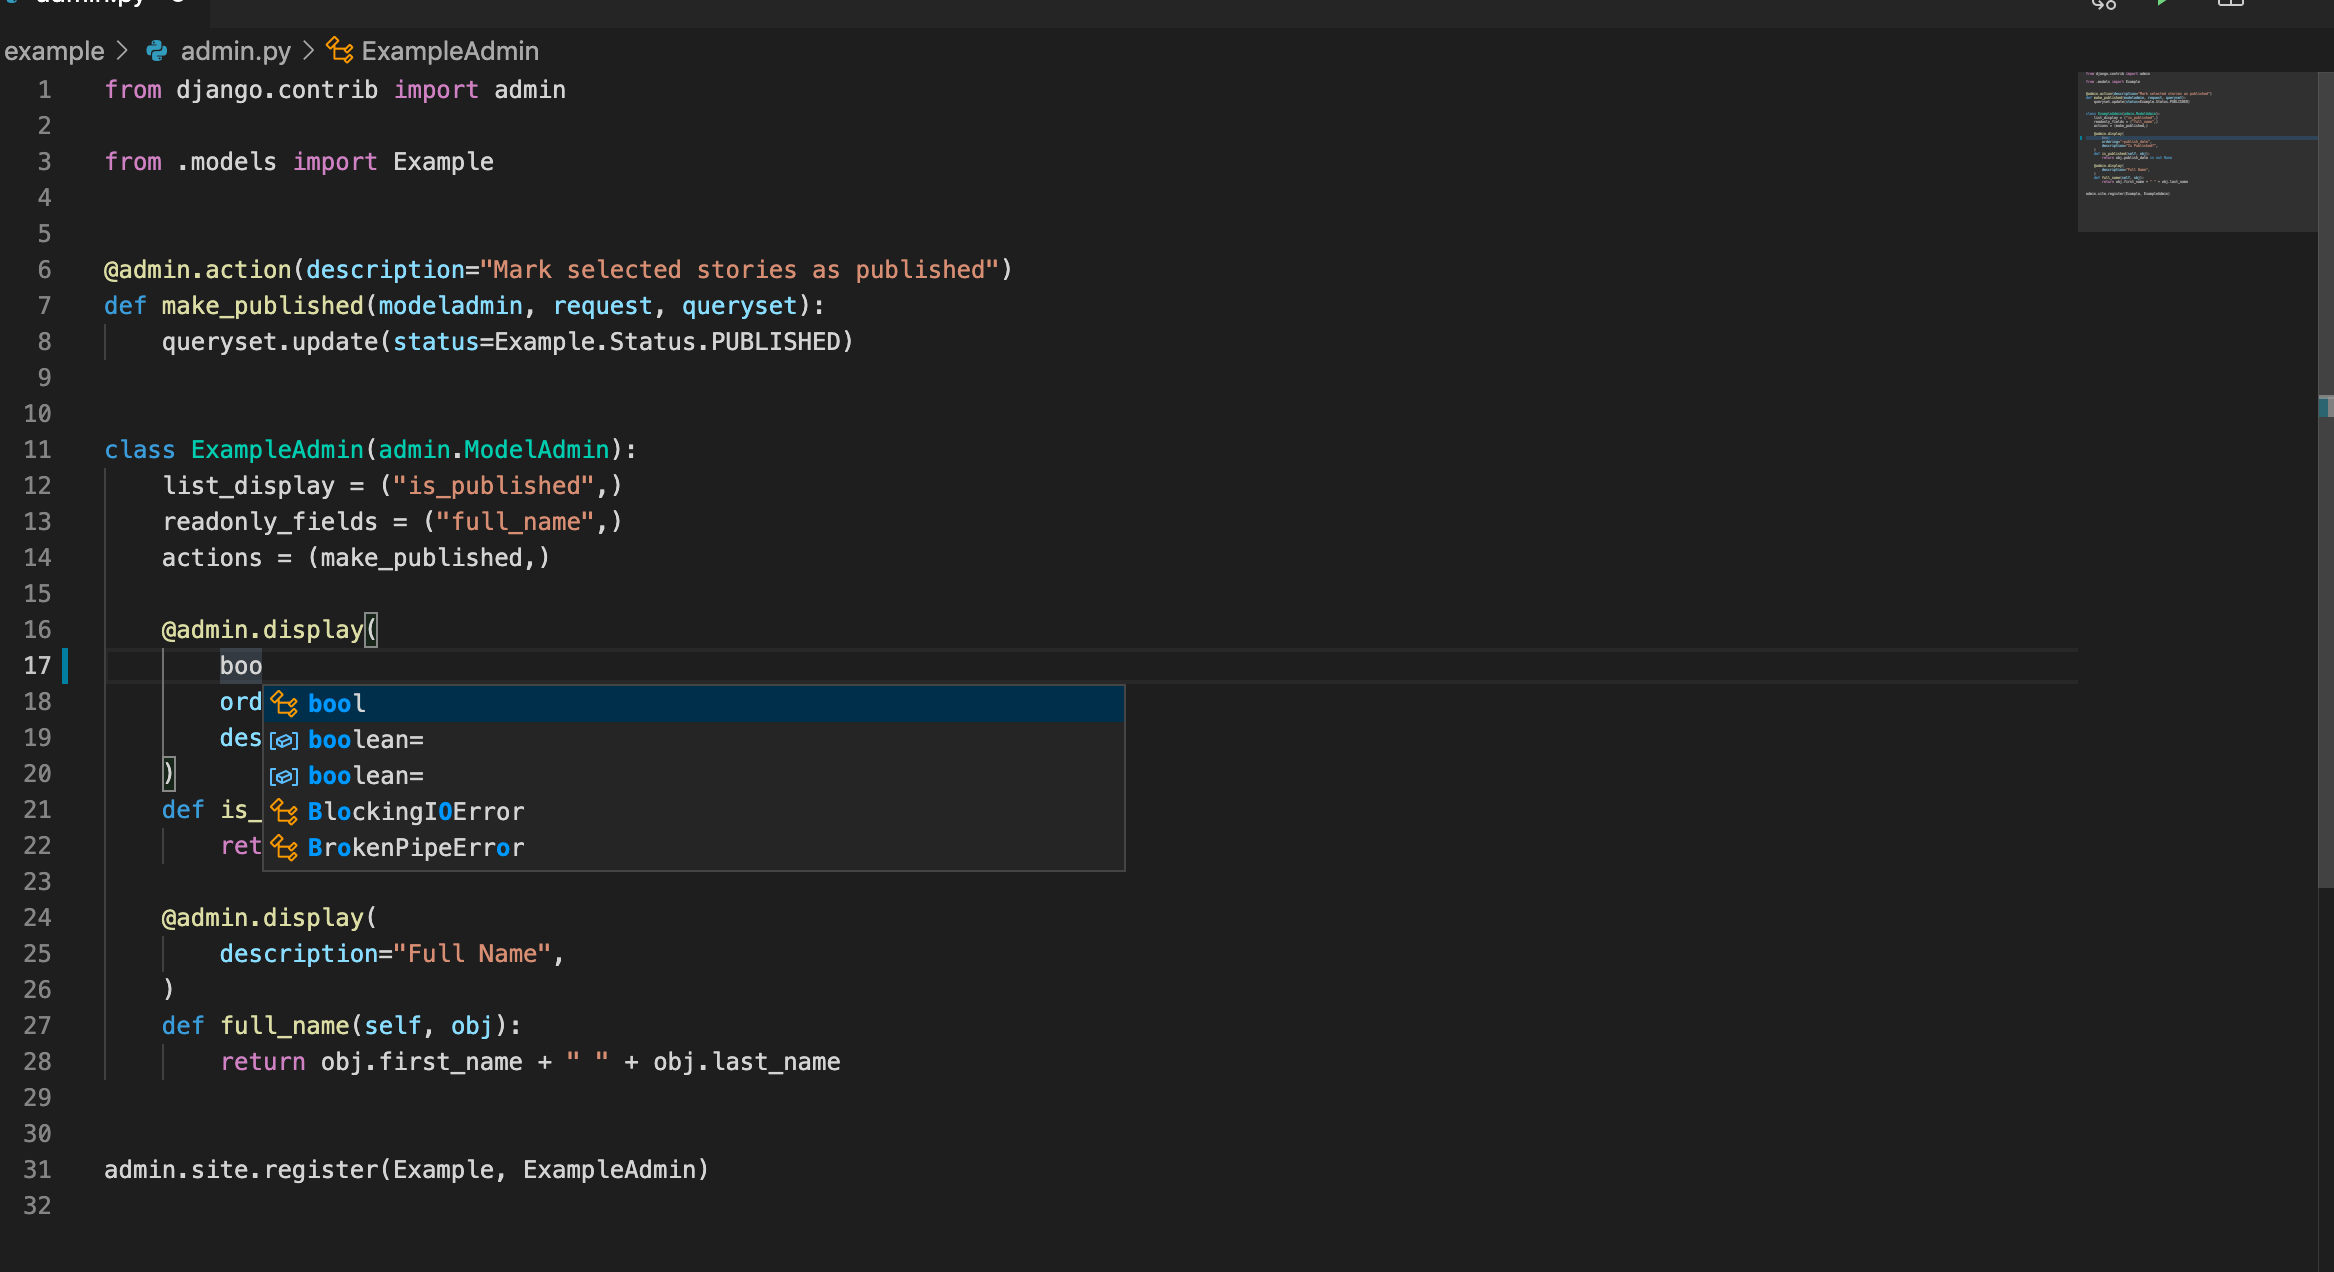
両者のコード量にあまり差はありませんが、3.2はデコレータになったことで補完機能があるエディタ(例: VS Code)で補完できるようになりました。
VS Codeでコード補完を使っている様子